Introduction
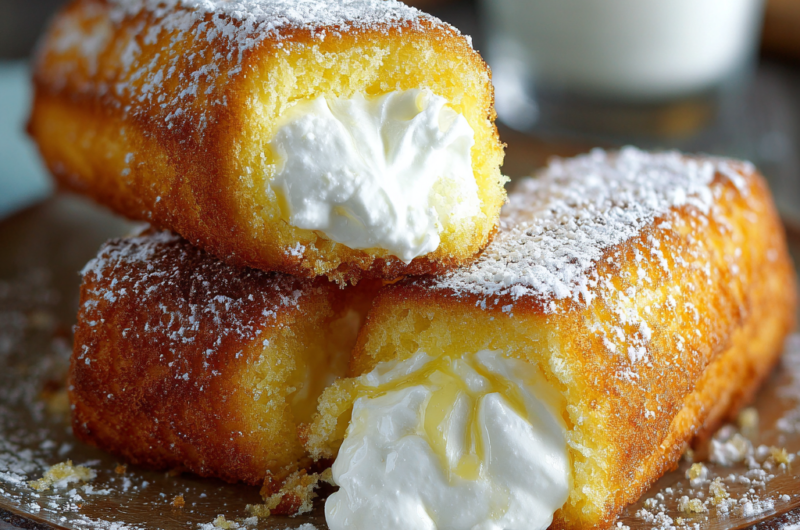
Twinkies, those iconic cream-filled sponge cakes, have captured the hearts and taste buds of many. Imagine a delightful dessert that combines a soft sponge cake with a luscious filling; this is the treat that inspires nostalgia while offering a fun baking challenge. Preparing homemade Twinkies allows you to indulge in a sweeter taste that's often more genuine than store-bought versions.
While the store-bought Twinkie has long been a staple, recreating them in your kitchen offers a thrilling opportunity to control the ingredients and personalize flavors. With a remarkable texture and a sweet cream filling, these homemade treats become a canvas for creativity. Whether it’s a family gathering or an afternoon treat, homemade Twinkies are sure to impress.
Ingredients
- 1 ½ cups all-purpose flour
Flour serves as the foundation of the cake, giving it structure and stability. The light, fluffy texture you associate with Twinkies results from a blend of proteins in the flour, which help create a delicate crumb. - 1 ½ tsp baking powder
Baking powder is a leavening agent that helps the cake rise and gain a light texture. It reacts with the other wet ingredients to produce gas, allowing the batter to expand during baking. - ½ tsp salt
Salt enhances flavor and balances sweetness in baked goods. It also strengthens the dough, contributing to a better texture and bringing out the other flavors. - ⅓ cup unsalted butter, softened
Butter adds richness and moisture to the cake, influencing both flavor and texture. The creaming process with sugar introduces air into the batter, contributing to a light and fluffy consistency. - 1 cup sugar
Sugar sweetens the cake, but it also plays a critical role in the structure by incorporating air when creamed with butter. This process contributes to a light texture in the final product. - 2 large eggs
Eggs not only help bind the ingredients together but also add moisture and richness to the cake. They act as emulsifiers, creating a uniform batter that helps achieve the desired texture. - 1 tsp vanilla extract
Vanilla extract adds depth of flavor, making the cake taste sweeter and more aromatic. It’s essential for achieving that familiar Twinkie taste. - ½ cup whole milk
Milk adds moisture to the batter, helping to create a tender crumb. It also helps to dissolve the dry ingredients, ensuring a smooth and even batter. - 1 cup heavy cream
The heavy cream is used for the filling, helping to create a rich, velvety texture. It whips up beautifully, allowing you to create a soft and decadent filling. - 1 cup powdered sugar
Powdered sugar sweetens the cream filling while adding a smooth texture. It dissolves into the cream easily, creating a luscious filling that contrasts nicely with the cake. - 1 tsp vanilla extract for filling
Just like in the cake, vanilla extract enhances the flavor of the filling, giving it that classic taste that complements the sponge cake perfectly. - Pinch of salt for filling
A pinch of salt in the filling heightens the sweetness and balances the flavors. It’s a subtle but essential addition that enriches the overall taste.
Directions & Preparation
Step 1: Preheat your oven to 350°F (175°C).
Preheating the oven is a crucial step that ensures the cake bakes evenly. An adequately heated oven prevents uneven rising and helps achieve the fluffy texture characteristic of Twinkies.
Step 2: In a medium bowl, whisk together flour, baking powder, and salt.
Whisking these dry ingredients together ensures they’re evenly distributed, preventing any clumps. This step is essential to make sure each bite is consistent in flavor and texture. By incorporating air, you also help in creating a lighter cake.
Step 3: In a large mixing bowl, cream together the softened butter and sugar until light and fluffy.
Creaming the butter and sugar is where the texture begins to form. The process introduces air into the mixture, which contributes to a light and airy cake. Continue until the mixture looks pale and fluffy, around 3-5 minutes.
Step 4: Add in the eggs one at a time, followed by the vanilla extract and mix until combined.
Incorporating the eggs one at a time allows for better emulsification, resulting in a smoother batter. The vanilla extract adds aroma and deepens the flavor profile, making the cake more delicious.
Step 5: Mix in the dry ingredients gradually, alternating with the milk, starting and ending with the flour mixture.
Adding the dry ingredients and milk alternately helps maintain the batter's consistency. This method ensures that the flour absorbs the moisture efficiently without developing gluten, which could create a denser cake.
Step 6: Spoon the batter into Twinkie molds or lined cupcake tins, filling each about 2/3 full.
Filling the molds appropriately is crucial for preventing overflow while baking. This step ensures that each Twinkie maintains its shape and achieves the desired rise during baking.
Step 7: Bake for 20-25 minutes, or until a toothpick inserted into the center comes out clean.
Baking times can vary based on your oven and the size of your molds. Monitoring the cakes closely as they approach the end of their baking time is crucial. The toothpick test is a reliable method to check for doneness.
Step 8: Let the cakes cool in the molds for 10 minutes before transferring them to a wire rack to cool completely.
Allowing the cakes to cool in the molds helps them set before being transferred, minimizing breakage. Cooling on a wire rack allows air to circulate around the cakes, preventing sogginess.
Step 9: While the cakes cool, prepare the filling by beating heavy cream, powdered sugar, vanilla, and salt until soft peaks form.
This step creates the rich and fluffy filling characteristic of Twinkies. Beating the cream until soft peaks form ensures it holds its shape when piped into the cakes. Overbeating can turn the filling into butter, so watch closely.
Step 10: Once cakes are cool, use a piping bag to fill each one with the whipped cream mixture.
Filling the cakes with the cream mixture is what transforms them into Twinkies. Equipping a piping bag with a long, narrow nozzle allows for precise filling, ensuring each cake is adequately stuffed.
Step 11: Optional: Dust the cakes with powdered sugar or drizzle with chocolate for added decoration.
Adding a visual touch with powdered sugar or chocolate can enhance the presentation of your Twinkies, making them even more tempting. It’s also an opportunity to elevate the flavor experience.

The Art of Twinkie Molds
Using specialized Twinkie molds may seem like a small detail, but it significantly impacts the final product. These molds help achieve the signature shape and ensure even baking. If you don’t have molds, creating a makeshift alternative with cupcake wrappers can also work, though the resulting cakes will be round instead of the iconic shape.
Perfecting the Creamy Filling
Achieving the right texture for the filling is a delicate balance of cream and sugar. The key is to ensure that the heavy cream is chilled and the mixing bowl is cold to whip properly. Be careful not to overmix, as the cream can quickly turn from light and fluffy to overly stiff, sacrificing the silky smooth mouthfeel that you want to complement the sponge cake.
Flavor Variations to Try
Once you’ve mastered the classic Twinkie recipe, consider exploring flavor variations. Infusing the cream with other flavors like chocolate or citrus zest can add a delightful twist. You could also experiment with flavored extracts in the cake batter itself, such as almond or lemon, to create a unique dessert that retains the beloved essence of a Twinkie while adding your personal touch.
FAQs
What if my batter is too thick?
If the batter is too thick, slowly incorporate an additional tablespoon of milk at a time until the desired consistency is achieved. This will help create a smoother batter without compromising the structure.
Why did my cakes come out flat?
Flat cakes can result from insufficient creaming of the butter and sugar, which fails to incorporate enough air. Ensure you cream them together until the mixture is light and fluffy before adding the eggs.
Can I reduce the sugar in the filling?
You can reduce the sugar in the filling, but do so gradually, as the sugar helps stabilize the whipped cream. Reducing it too much might make the filling less stable.
How can I incorporate different flavors into the filling?
For varied flavors, consider adding pureed fruits or flavored extracts into the whipped cream filling. Keep in mind that this may affect the texture, so adjust sugar levels accordingly.
My whipped cream filling turned into butter, what happened?
This occurs if the cream was beaten for too long. Always watch the cream closely during mixing and stop as soon as soft peaks form.
Can I use low-fat milk in the cake batter?
Using low-fat milk can yield a denser cake, as the fat content in whole milk contributes to the richness and moisture of the final product. For best results, stick with whole milk.
How can I increase the flavor without making it too sweet?
To enhance the flavor without adding extra sweetness, consider incorporating a bit of espresso powder or citrus zest into the cake batter, which can complement and elevate the sweet taste naturally.
Conclusion
Creating homemade Twinkies is not only a rewarding experience but also a fun way to share a classic treat with loved ones. As you explore this recipe, remember that practice makes perfect, and each batch can be an opportunity to improve your technique.
Whether you stick with the traditional flavor or mix it up with your variations, the satisfaction of biting into a homemade Twinkie surpasses anything store-bought. Enjoy your baking journey and the sweet rewards that come with it.
Recipe Card

Crafting Delicious Homemade Twinkies at Home
Ingredients
Method
- Preheat your oven to 350°F (175°C).
- In a medium bowl, whisk together flour, baking powder, and salt.
- In a large mixing bowl, cream together the softened butter and sugar until light and fluffy.
- Add in the eggs one at a time, followed by the vanilla extract and mix until combined.
- Mix in the dry ingredients gradually, alternating with the milk, starting and ending with the flour mixture.
- Spoon the batter into Twinkie molds or lined cupcake tins, filling each about 2/3 full.
- Bake for 20-25 minutes, or until a toothpick inserted into the center comes out clean.
- Let the cakes cool in the molds for 10 minutes before transferring them to a wire rack to cool completely.
- While the cakes cool, prepare the filling by beating heavy cream, powdered sugar, vanilla, and salt until soft peaks form.
- Once cakes are cool, use a piping bag to fill each one with the whipped cream mixture.
- Optional: Dust the cakes with powdered sugar or drizzle with chocolate for added decoration.
Notes
Additional serving suggestions: pair with a crisp salad, garlic bread, or roasted seasonal vegetables for balance.
For make-ahead, prep components separately and assemble just before heating to preserve texture.
Taste and adjust with acid (lemon/vinegar) and salt right at the end to wake up flavors.