Introduction
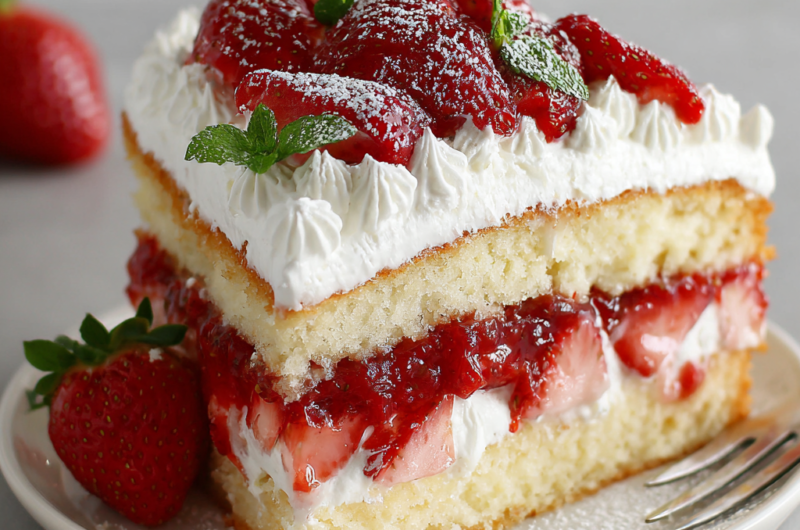
There's something magical about the combination of strawberries, whipped cream, and soft, buttery cake. Strawberry Shortcake Layer Cake encapsulates these flavors in a stunning dessert that’s perfect for any occasion, from birthdays to summer barbecues.
This dessert is not just a treat for the taste buds but also a feast for the eyes. Each layer presents a beautiful display of fresh strawberries nestled in fluffy cream, making it a showstopper at any gathering. As we dive into the process of creating this cake, you’ll find that, with a little patience and care, you'll impress your guests with a slice of rose-hued delight.
Prepare for a baking journey that celebrates the best of summer's bounty! With low-stress preparation and simple ingredients, any home cook can master this cake and make memories while doing so.
Ingredients
- 2 cups all-purpose flour
All-purpose flour provides the structure for your cake, allowing it to rise beautifully while maintaining a tender texture that is ideal for layer cakes. - 1 ½ cups granulated sugar
Granulated sugar not only sweetens the cake but also helps create a light and fluffy texture when combined with butter, resulting in a moist crumb. - ½ cup unsalted butter, softened
Butter adds richness and flavor to the cake. The creaming process, where butter is beaten with sugar, incorporates air into the batter, giving the cake its lightness. - 3 large eggs
Eggs are essential for binding the ingredients, contributing to the cake's moisture, and helping it rise. They also add a lovely richness to the overall flavor. - 1 cup whole milk
Whole milk enriches the batter, resulting in a tender crumb. Its fat content aids in the cake's moistness, balancing the sweetness perfectly. - 2 teaspoons baking powder
Baking powder acts as a leavening agent, ensuring that your cake rises well and achieves a light texture. It helps create the perfect balance between fluffiness and density. - ½ teaspoon salt
Salt enhances the overall flavor of the cake, balancing the sweetness and bringing out the natural flavors of the other ingredients. - 3 cups fresh strawberries, hulled and sliced
Fresh strawberries are the star of this dessert. They add natural sweetness and freshness, their juice infusing the cake layers with a superb fruity flavor. - 2 cups heavy cream
Heavy cream is whipped to create the light and airy frosting that envelopes the cake. The fat content gives it stability and lusciousness, making each bite heavenly. - 2 tablespoons powdered sugar
Powdered sugar sweetens the whipped cream without making it grainy. It also helps achieve a smoother texture, perfect for topping your cake. - 1 teaspoon vanilla extract
Vanilla extract enhances the flavor of both the cake and the whipped cream, adding a warm and inviting aroma to every slice.
Directions & Preparation
Step 1: Preheat the oven to 350°F (175°C).
Preheating the oven ensures that your cake bakes evenly and rises properly. Starting at the right temperature means that your cake will have a better texture and consistency throughout, avoiding potential undercooked or overcooked sections.
Step 2: Grease and flour three 8-inch round cake pans.
Properly greasing and flouring the pans prevents the cake from sticking, allowing for easy removal once baked. This is crucial for maintaining the beautiful layers of your cake and ensures a clean, professional presentation.
Step 3: In a large mixing bowl, cream together the softened butter and granulated sugar until light and fluffy.
This step is essential as it introduces air into the mixture, contributing to a lighter cake. Creaming also blends the flavors of butter and sugar, setting a flavorful foundation for your layer cake.
Step 4: Add the eggs, one at a time, mixing thoroughly after each addition.
Incorporating the eggs one at a time allows each egg to fully blend with the batter, creating a uniform mixture. This step is crucial for ensuring proper binding and moisture in the finished cake.
Step 5: In another bowl, whisk together the flour, baking powder, and salt.
Whisking the dry ingredients together helps distribute the baking powder and salt evenly, ensuring consistent rising throughout the cake. It also helps to sift out any clumps, leading to a smoother batter.
Step 6: Gradually add the dry mixture to the creamed butter and sugar, alternating with the milk, starting and ending with the flour mixture.
Alternating the wet and dry ingredients prevents the batter from becoming too thick and ensures thorough mixing without overworking the flour. This method helps maintain the cake's desired tender crumb.
Step 7: Divide the batter equally among the prepared cake pans.
Dividing the batter evenly is essential for achieving uniform layers. This ensures that each layer bakes at the same rate and helps create a balanced structure in the final cake.
Step 8: Bake in the preheated oven for 25-30 minutes, or until a toothpick inserted in the center comes out clean.
Baking time is crucial; too little can lead to dense, uncooked cake while too much can dry it out. The toothpick test is a great indicator of doneness, letting you check without damaging your cake.
Step 9: Cool the cakes in their pans for 10 minutes, then transfer them to wire racks to cool completely.
Cooling the cakes in their pans allows them to set slightly, making them easier to handle. Transferring to wire racks ensures even cooling, preventing moisture buildup that could lead to sogginess.
Step 10: While the cakes cool, prepare the whipped cream by beating heavy cream, powdered sugar, and vanilla extract until soft peaks form.
Properly whipping the cream creates a stable topping that holds its shape as you layer the cake. Keeping an eye on the peaks is key; soft peaks are ideal for a light, airy texture that complements the cake.
Step 11: Once the cakes are completely cooled, level the tops if necessary and place the first layer on a cake stand.
Leveling ensures each layer is even, contributing to a stable cake structure. Starting with the first layer on a stand allows for easy assembly and decorating as you build the layers.
Step 12: Spread a layer of whipped cream over the first cake layer, followed by a layer of fresh strawberries.
This step adds flavor and moisture, with the strawberries creating a delightful contrast to the cream. The combination not only enhances taste but also adds visual appeal, making each slice a treat.
Step 13: Repeat the process with the second layer, followed by the third layer.
Layering the cake correctly is vital for a balanced structure and flavor distribution. Each layer not only complements the others but builds the overall height and elegance of your cake.
Step 14: Use the remaining whipped cream to frost the top and sides of the cake.
Frosting the cake serves as a final layer of sweetness and adds a decorative touch. A smooth finish and even distribution of cream complete the cake's elegant presentation.
Step 15: Garnish the top with additional sliced strawberries for decoration.
Garnishing the cake not only enhances its aesthetic appeal but also gives guests an enticing glimpse of what’s inside. Fresh strawberries on top create a vibrant focal point, enticing everyone to dig in.
Step 16: Chill the assembled cake in the refrigerator for at least an hour before serving.
Chilling the cake allows the layers to set and ensures the whipped cream holds its shape, making for cleaner slices. It also melds the flavors, resulting in a more harmonious dessert experience.

Understanding Strawberry Selection for Maximum Flavor
Choosing the right strawberries is key to achieving a flavorful cake. Look for berries that are bright red, firm, and fragrant. Fresh strawberries in season offer a sweetness that frozen ones simply can’t replicate. For the best results, avoid any with bruises or soft spots. During preparation, taste your strawberries to ensure they’re perfectly ripe, as this foundation will enhance every layer of your dessert.
Whipping Cream: Achieving the Perfect Texture
The key to luscious whipped cream lies in the whipping technique. Start with chilled heavy cream and a cold mixing bowl for optimal results. Beat until soft peaks form without overwhipping, which can lead to a grainy texture. This fluffy cream should be light yet stable enough to hold layers, so a gentle fold into your cake is essential. Remember that the balance of sweetness with powdered sugar also enhances the overall flavor.
Layering Techniques for an Impressive Presentation
Layering the cake presents an artful challenge that elevates its appearance. Level each cake layer for uniformity, and don’t skimp on the whipped cream between layers—it should be generous but not overwhelming. When stacking, ensure each layer is centered for a clean finish. As you decorate, consider the sides too; keep a smooth outer layer and make your top visually appealing with additional strawberries or a drizzle of syrup for added flair.
FAQs
What if my cake layers are uneven?
If your layers aren’t even, you can trim the tops with a serrated knife to create a flat surface. This helps them stack better, ensuring a more stable and visually appealing cake.
How can I keep my whipped cream from deflating?
To maintain the integrity of your whipped cream, ensure you're using cold cream and avoid overmixing. Stabilizers like powdered sugar can also help your cream hold its peaks longer.
What if the cake is too sweet for my taste?
If the sweetness is overwhelming, you can balance it out with slightly tart whipped cream or more fresh strawberries. Adding a pinch of salt can also tone down sweetness effectively.
Can I add other fruits to this layer cake?
Yes! Other fruits like raspberries or blueberries can be added alongside strawberries to enhance flavor complexity and add visual appeal. Just ensure they complement the cake's overall taste.
How can I adjust this recipe for a larger cake?
To scale the recipe up, multiply the ingredient quantities proportionally. You may also need larger pans and adjust baking times to ensure even baking.
What if my whipped cream is too thin?
If your whipped cream turns out too thin, try refrigerating it for 10-15 minutes and rewhipping. Adding a touch more powdered sugar can also help create a stiffer consistency.
Can I use a different type of cream for frosting?
You can substitute with a lighter option like mascarpone or even a non-dairy whipped cream. Just keep in mind that it will alter the flavor and texture slightly.
What if my strawberries are too tart?
If the strawberries are too tart, try macerating them with a little sugar before layering. This will enhance their sweetness and soften them, creating a more balanced flavor in the cake.
Conclusion
Creating a Strawberry Shortcake Layer Cake is not only an enjoyable process, but the rewards are immense when you see your loved ones delighting in each slice. This dessert embodies summer's sweetness and offers a satisfying bite that’s both nostalgic and elegant.
With the right care and attention, you can make this cake a firm favorite in your household. It's adaptable, allowing for seasonal fruit variations or simple improvisations to suit your taste. Enjoy the process and the joy it brings!
Recipe Card

Strawberry Shortcake Layer Cake for Every Celebration
Ingredients
Method
- Preheat the oven to 350°F (175°C).
- Grease and flour three 8-inch round cake pans.
- In a large mixing bowl, cream together the softened butter and granulated sugar until light and fluffy.
- Add the eggs, one at a time, mixing thoroughly after each addition.
- In another bowl, whisk together the flour, baking powder, and salt.
- Gradually add the dry mixture to the creamed butter and sugar, alternating with the milk, starting and ending with the flour mixture.
- Divide the batter equally among the prepared cake pans.
- Bake in the preheated oven for 25-30 minutes, or until a toothpick inserted in the center comes out clean.
- Cool the cakes in their pans for 10 minutes, then transfer them to wire racks to cool completely.
- While the cakes cool, prepare the whipped cream by beating heavy cream, powdered sugar, and vanilla extract until soft peaks form.
- Once the cakes are completely cooled, level the tops if necessary and place the first layer on a cake stand.
- Spread a layer of whipped cream over the first cake layer, followed by a layer of fresh strawberries.
- Repeat the process with the second layer, followed by the third layer.
- Use the remaining whipped cream to frost the top and sides of the cake.
- Garnish the top with additional sliced strawberries for decoration.
- Chill the assembled cake in the refrigerator for at least an hour before serving.