Introduction
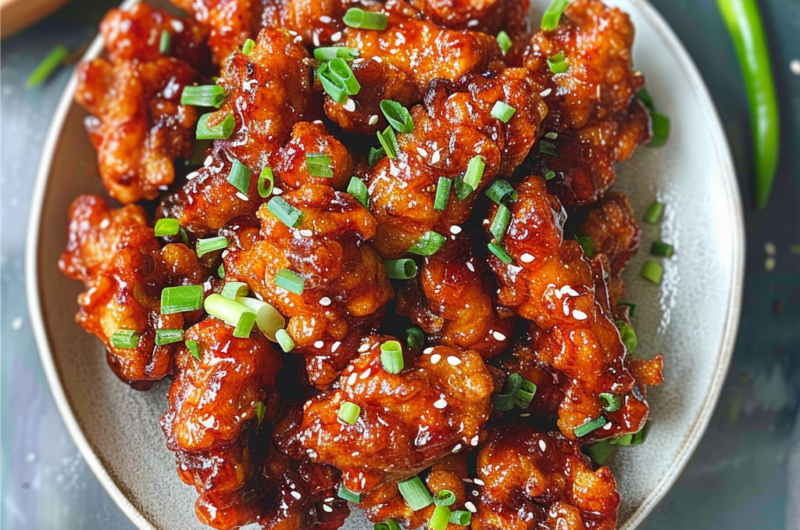
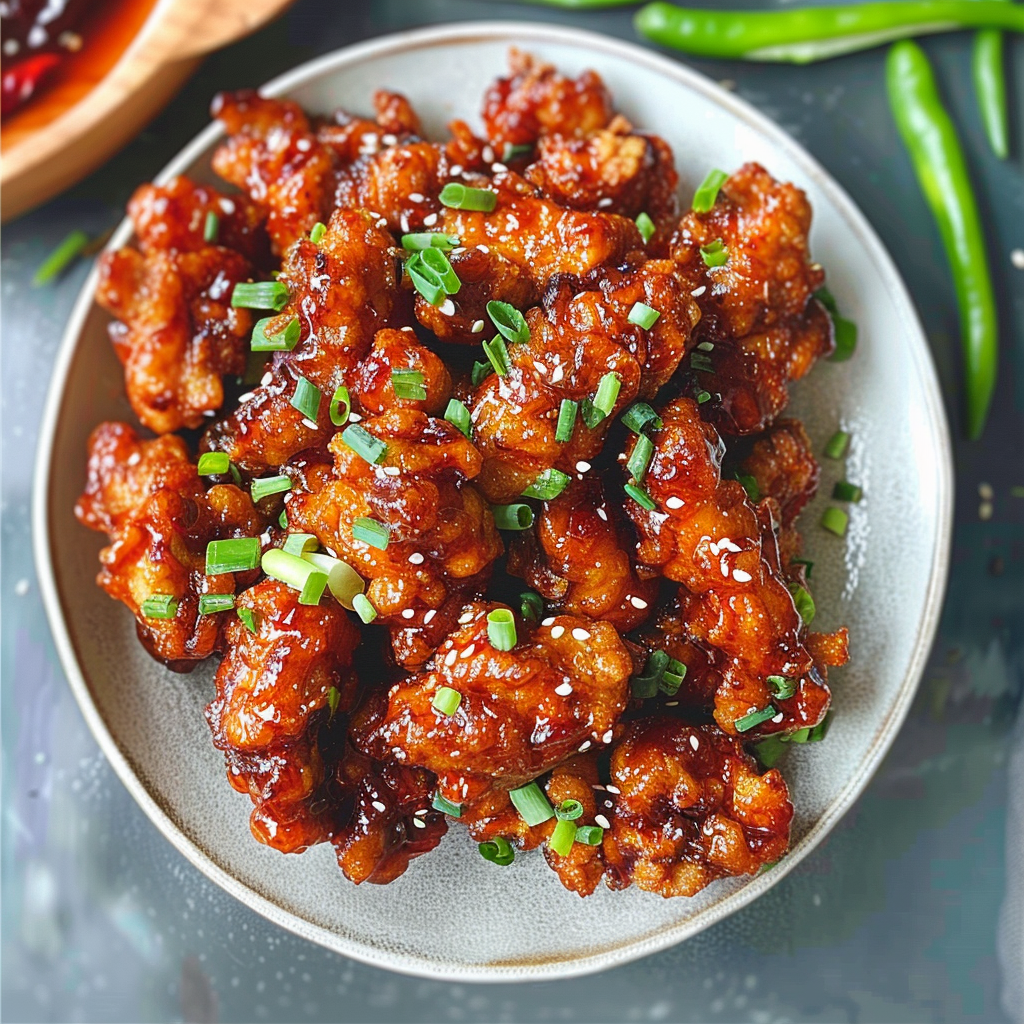
Crispy Chilli Chicken is a delicious dish that perfectly balances saltiness, sweetness, and spiciness. It is a favorite among many who enjoy Asian-inspired flavors with a satisfying crunch. Perfect for home cooks looking to elevate their weekday dinner or impress guests.
This recipe combines juicy chicken thighs with a crispy coating, all tossed in a brilliant chilli sauce that offers a burst of flavor. The preparation is straightforward, making it ideal for those who enjoy cooking but want to keep things simple yet impressive.
Serve this dish as a standalone treat or with steamed rice and seasonal vegetables for a complete meal. Let's dive into the ingredients and see how you can create this culinary delight in your own kitchen.
Ingredients
- 500g chicken thighs
Opting for chicken thighs ensures a juicier texture and richer flavor compared to breast meat. Thighs retain moisture during cooking, providing a tender bite that pairs well with the crispy coating. - 1 cup all-purpose flour
Flour is essential for creating that crunchy exterior. It absorbs moisture, aiding in achieving a golden-brown coating when fried while providing a base for the spices. - 2 eggs
Eggs act as a binding agent that helps the flour adhere to the chicken. They create a thicker coating, adding to the crispiness after frying. - 1 tsp garlic powder
Garlic powder enhances the flavor of the chicken, providing a subtle but essential depth to the dish. It complements the other spices and helps to enrich the overall savory profile. - 1 tsp paprika
Paprika contributes a mild smokiness and vibrant color to the crust. It complements the other spices while also adding a hint of sweetness. - 1/2 tsp salt
Salt is crucial for seasoning the chicken. It enhances the natural flavors and promotes better moisture retention in the meat during cooking. - 1/2 cup corn starch
Corn starch aids in achieving an extra crispy texture. When combined with flour, it makes the coating lighter and crunchier. - 1/4 cup soy sauce
Soy sauce is used in the marinade and the sauce, imparting a deep umami flavor that enhances the overall taste of the dish. - 2 tbsp honey
Honey adds a touch of sweetness and helps to balance the heat from the chilli. It also contributes to the stickiness of the sauce, allowing it to cling to the crispy chicken. - 2-3 green chillies
Fresh green chillies provide a vibrant heat that brightens the dish. Adjust the quantity based on your spice tolerance for a more personalized heat level. - 1 tbsp sesame oil
Sesame oil adds nutty flavor and richness to the sauce. It enhances the overall sensory experience of the dish and ties together all of the flavors. - Chopped spring onions for garnish
Spring onions add freshness and a mild onion flavor, enhancing the presentation and providing a pop of color to the finished dish.
Directions & Preparation
Step 1: Prepare the chicken by cutting it into bite-sized pieces.
Cutting the chicken into smaller pieces ensures even cooking and maximizes the crispy surface area. It allows flavors to penetrate better and makes the dish easier to enjoy. Aim for pieces that are uniform in size to help maintain consistent cooking times.
Step 2: Marinate the chicken with soy sauce, salt, and garlic powder for at least 30 minutes.
Marinating allows the chicken to absorb the flavors, making it more savory and enhancing overall taste. The salt and soy sauce not only provide flavor but also tenderize the chicken, making the final product succulent. Aim for at least 30 minutes, but marinating longer will yield even better flavor.
Step 3: In one bowl, combine all-purpose flour, corn starch, paprika, and salt.
This flour mixture is vital for creating a crisp texture. The combination of all-purpose flour and corn starch helps in forming a light yet crunchy crust upon frying. Mixing the dry ingredients beforehand ensures an even distribution of flavors on every piece of chicken.
Step 4: In another bowl, whisk the eggs until smooth.
Whisking the eggs until smooth ensures they coat the chicken evenly, allowing the flour mixture to adhere properly. This step is crucial for achieving that desirable crunch; any lumps will result in uneven coating and less crispy bites.
Step 5: Coat each marinated chicken piece in the egg mixture, then dredge in the flour mixture.
Coating the chicken in egg creates a tacky surface that helps the flour cling better. A thorough dredge ensures each piece is well-covered, enhancing the crispness after frying. Take your time with this step for maximum crunch.
Step 6: Heat oil in a pan over medium-high heat until hot.
Properly heating the oil is crucial for achieving that golden-brown crispiness without absorbing too much oil. Test the oil temperature by dropping a small amount of batter in; if it sizzles immediately, you are ready to fry. Maintain a consistent temperature for even cooking.
Step 7: Fry the chicken pieces in batches until golden brown and cooked through.
Frying in batches prevents overcrowding, which can lead to steaming instead of frying. Keep an eye on the color and flip the pieces for even cooking. They should take about 4-5 minutes per side, depending on your heat level. Use a slotted spoon to remove them and allow draining on paper towels.
Step 8: Prepare the sauce by heating sesame oil in a pan, then adding honey and chopped green chillies.
Heating sesame oil releases its full flavor, creating a fragrant base for the sauce. Adding honey contributes sweetness and balances the heat from the chillies, while green chillies enhance the flavor profile. Stir until combined and sticky, ensuring all ingredients meld together seamlessly.
Step 9: Toss the crispy chicken pieces in the sauce until evenly coated.
This is where all the flavors come together. Tossing the chicken in the sauce while it’s still warm ensures that the coating clings well and every piece is evenly coated in the sauce, adding flavor without losing the crunch. Serve immediately for the best texture.
Step 10: Garnish with chopped spring onions before serving.
Garnishing the dish adds an appealing visual element and a hint of freshness that brightens off the rich and spicy characteristics of the dish. Spring onions introduce a mild, spicy crunch that balances the flavors, making each bite more enjoyable.

Choosing the Right Chicken for Crispy Chilli Chicken
The choice of chicken is fundamental in achieving the perfect texture for crispy chilli chicken. Thighs provide the best moisture and flavor but are also forgiving during cooking, helping to prevent dry spots. If you prefer a lighter option, chicken breasts can be used, though they often require more careful attention during cooking to maintain juiciness.
Creating the Perfect Chilli Sauce
The sauce is where the magic happens, as it determines the flavor profile of your crispy chilli chicken. Balancing the heat with honey allows the dish to maintain its addictive quality. Always taste your sauce before tossing the chicken; adjust the spice or sweetness based on your preference. For a deeper flavor, consider adding a splash of vinegar or lime juice to the mix at the end.
Achieving Maximum Crispiness
The secret to that irresistible crunch lies both in the coating and frying technique. A mix of all-purpose flour and corn starch is ideal; corn starch absorbs moisture and amplifies crunch. Additionally, ensuring your oil is hot enough during frying is crucial – too low, and the chicken becomes greasy. For an extra crisp, let the coated chicken rest for 10 minutes before frying to allow the coating to set.
FAQs
What if my chicken coating is too thick?
If your coating is overly thick, it may cause uneven cooking or a chewy texture. Try tapping off excess flour before frying or adjusting your egg mixture to be less viscous.
Can I use chicken breasts instead of thighs?
Yes, chicken breasts can be used, but watch them closely while cooking, as they tend to dry out quicker than thighs. Consider brining them beforehand for added moisture.
How can I make the sauce less spicy?
To tone down the spiciness, reduce the number of green chillies used. You could also add a little extra honey to balance the heat or a splash of coconut milk for creaminess.
What if my chicken turns out bland?
If the chicken lacks flavor, it may need more marinating time. Also, consider increasing the salt and spice levels in the marinade for a more robust taste next time.
What happens if I overcook the chicken?
Overcooking will make the chicken dry and tough. Monitor the cooking time closely and use a meat thermometer; chicken should reach an internal temperature of 75°C or 165°F.
Can I add vegetables to this recipe?
Yes, you can stir-fry vegetables such as bell peppers, broccoli, or snap peas with the sauce for added nutrition and color. Just ensure they are cooked to a tender-crisp before tossing with the chicken.
Conclusion
Crispy Chilli Chicken is a versatile and satisfying dish, perfect for any occasion. With its blend of flavors and textures, it promises to be a hit at your dinner table. Take the time to marinate and fry properly for the best results.
Experiment with the level of spice and sauce ingredients to make this dish your own. Now that you've mastered the crispy chilli chicken recipe, why not try pairing it with your favorite sides or make it a part of a larger feast? Enjoy the delicious journey of cooking!
Recipe Card
Crispy Chilli Chicken Recipe Perfect for Home Cooks
Ingredients
Method
- Prepare the chicken by cutting it into bite-sized pieces.
- Marinate the chicken with soy sauce, salt, and garlic powder for at least 30 minutes.
- In one bowl, combine all-purpose flour, corn starch, paprika, and salt.
- In another bowl, whisk the eggs until smooth.
- Coat each marinated chicken piece in the egg mixture, then dredge in the flour mixture.
- Heat oil in a pan over medium-high heat until hot.
- Fry the chicken pieces in batches until golden brown and cooked through.
- Prepare the sauce by heating sesame oil in a pan, then adding honey and chopped green chillies.
- Toss the crispy chicken pieces in the sauce until evenly coated.
- Garnish with chopped spring onions before serving.
Notes
Additional serving suggestions: pair with a crisp salad, garlic bread, or roasted seasonal vegetables for balance.
For make-ahead, prep components separately and assemble just before heating to preserve texture.
Taste and adjust with acid (lemon/vinegar) and salt right at the end to wake up flavors.